 Merken
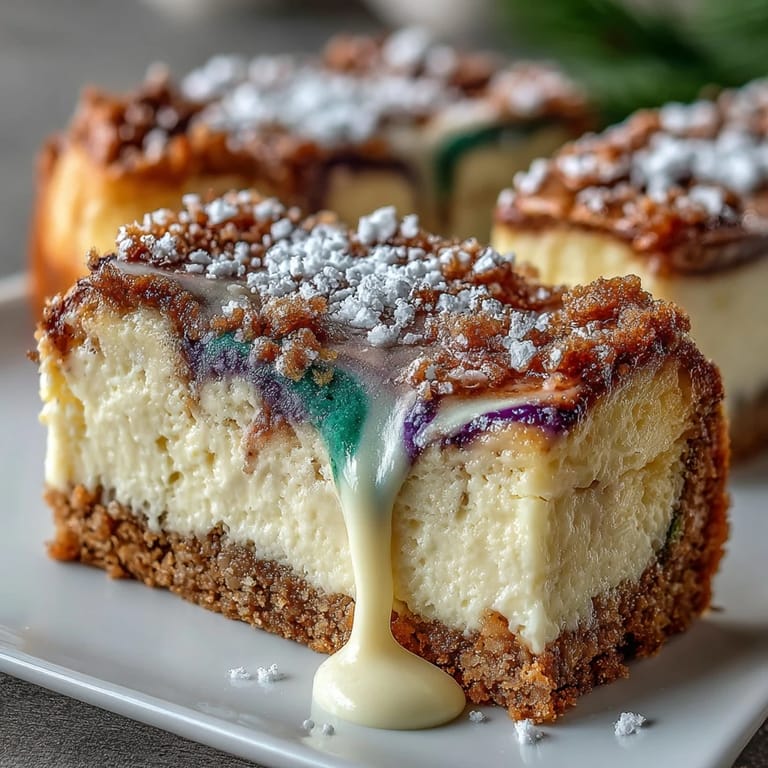
 I discovered this recipe during a particularly chaotic Mardi Gras season when my neighbor showed up with a pan of these vibrant bars, and I couldn't stop eating them straight from the fridge. The way those purple, green, and gold swirls caught the light made them feel like edible confetti, but biting into that creamy cheesecake center over a cinnamon-spiced crust? That's when I realized someone had figured out how to marry two entirely different celebrations into one dessert. I spent the next week experimenting in my kitchen until I nailed it, and now these bars have become my secret weapon for any gathering that calls for something festive.
I'll never forget bringing these to a small party last year and watching people's faces light up when they saw the colors. One guest actually gasped, then immediately asked for the recipe, and I loved that moment of pure, unguarded joy that came from something I'd made with my own hands. That's when I knew these bars deserved to be shared more widely.
Ingredients
- Graham cracker crumbs: These form the foundation and add that subtle sweetness and texture that keeps things from feeling too heavy.
- Granulated sugar (for crust): Works alongside the cinnamon to create a warm, slightly spiced base layer.
- Ground cinnamon: The secret to making people say "I taste something but can't quite name it" before they realize you've nailed that king cake magic.
- Salt: Balances the sweetness and makes the cinnamon sing.
- Unsalted butter, melted: Binds everything together and creates that gorgeous, slightly crumbly texture.
- Cream cheese, softened: This needs to be soft or your batter will be lumpy and sad, so pull it out about an hour before you start mixing.
- Granulated sugar (for filling): Sweetens the cheesecake layer without adding moisture.
- Large eggs: Bring them to room temperature too, and add them one at a time so they blend in smoothly without overbeating.
- Sour cream: Adds a subtle tang that keeps the cheesecake from tasting one-note sweet.
- All-purpose flour: Just a tablespoon prevents cracks and adds structure without making things dense.
- Vanilla extract: Don't skip this, as it deepens the flavor quietly.
- Almond extract (optional): A tiny hint that whispers of king cake tradition without overwhelming anything.
- Gel food coloring (purple, green, yellow): Gel matters because liquid coloring will thin your batter and ruin the swirl game.
- Powdered sugar, milk, and vanilla (for icing): A simple glaze that lets the colors shine through without competing.
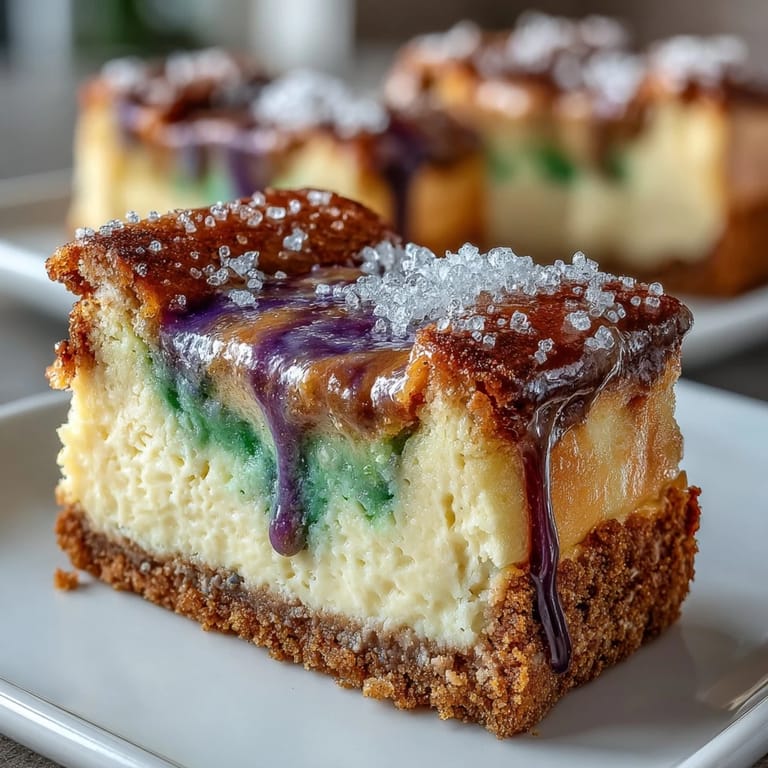
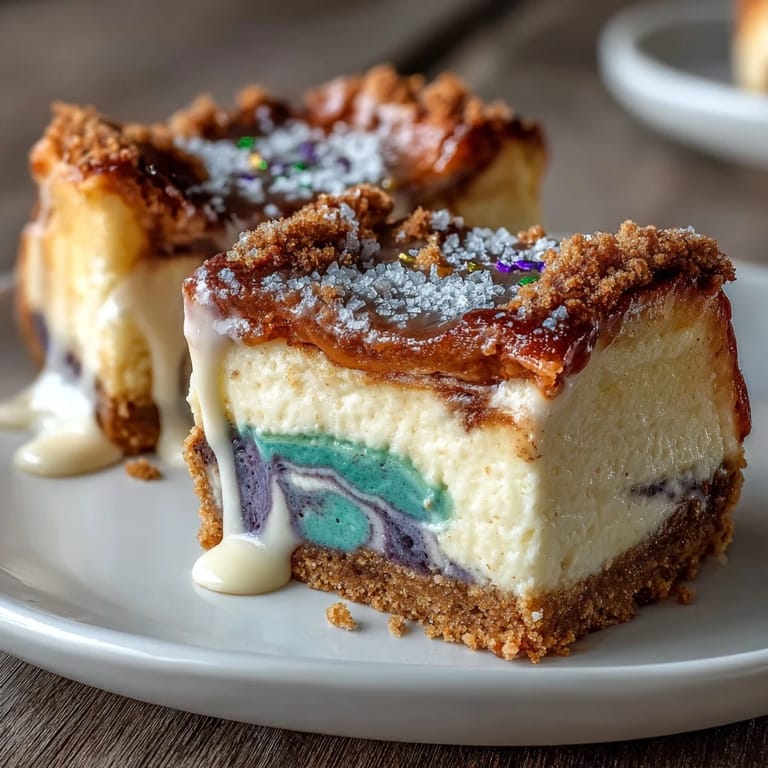
- Sanding sugar (purple, green, gold): The final festive touch that catches light and makes these feel like a celebration in bar form.
Tired of Takeout? 🥡
Get 10 meals you can make faster than delivery arrives. Seriously.
One email. No spam. Unsubscribe anytime.
Instructions
- Prepare your stage:
- Heat your oven to 325°F and line that 9x9-inch pan with parchment paper, leaving enough overhang so you can lift the whole thing out later without wrestling with it. This step saves you from frustration.
- Build the crust:
- Mix graham cracker crumbs with sugar, cinnamon, and salt, then pour in melted butter and stir until it looks like wet sand. Press it firmly into the bottom of your pan and bake for 10 minutes just until it firms up slightly and smells incredible, then set it aside to cool while you move to the next step.
- Create the cheesecake base:
- Beat softened cream cheese and sugar together until it's smooth and creamy, which takes about two minutes if your cheese is actually soft. Add eggs one at a time, beating well after each one, then fold in the sour cream, flour, vanilla, and almond extract until just combined without overworking it.
- Divide and color:
- Split your batter into three bowls and add a different gel color to each one, stirring gently until the color spreads evenly throughout. The batter should look vibrant but not metallic.
- Create the swirl:
- Drop spoonfuls of each colored batter randomly over that cooled crust like you're being playful about it, then take a knife or skewer and drag it gently through the colors to create that marbled effect. The key is restraint here because overmixing turns your beautiful swirls into muddy brown.
- Bake until set:
- Slide it into the oven for 35 to 40 minutes, watching until the center jiggles just slightly when you nudge the pan but the edges look set. You're not looking for a fully firm cheesecake, just one that's past the jiggling stage but not overbaked and cracked.
- Cool and chill:
- Let it come to room temperature, then cover and refrigerate for at least four hours or overnight so the flavors settle and the texture becomes perfect. Patience here is everything.
- Finish and serve:
- Whisk together powdered sugar, milk, and vanilla until smooth, then drizzle it over the chilled bars before sprinkling with sanding sugar. Slice into sixteen squares and watch people's faces when they see what you've made.
 Merken
 These bars changed something for me in how I think about sharing food with people. There's something about presenting something this visually striking that makes even casual get-togethers feel like celebrations.
The Magic of Marbling
I spent my first attempt trying to create perfectly even swirls, dragging that knife through the batter with the precision of someone doing surgery. The result looked nice enough, but it felt stiff and calculated, and honestly, the colors blended too much. The next time, I let myself be looser with it, just making gentle movements through the batter without overthinking, and suddenly the swirls felt organic and alive. That's when I realized that this technique rewards a lighter touch and a willingness to let some chaos exist in the design.
Why These Bars Beat Traditional Cheesecake
The cinnamon crust adds warmth that a plain graham base never quite achieves, and the fact that we're not doing a water bath means no cracking, no elaborate setup, and no failed attempts that leave you frustrated. The smaller format also means you get a crispy edge on every piece, which is something my family argues about when I make regular cheesecake in a springform pan. Plus, bars are infinitely more portable and party-friendly than slices that demand careful plating.
Making It Your Own
Once you understand the basic structure, this recipe invites experimentation in the best ways. I've tried swapping the vanilla wafer crumbs in the crust for digestive biscuits and loved the slightly earthier taste, and a friend of mine infused her cream cheese layer with a hint of lemon zest because that's what her family adores. The sanding sugar colors don't have to be Mardi Gras themed either, so feel free to pick shades that match whatever you're celebrating.
- For an authentic Mardi Gras twist that guests will actually remember, hide a small plastic baby in one of the bars after baking and chill it all together, but absolutely warn your guests before they bite into it.
- If you're making these for someone with nut allergies, simply skip the almond extract and double check your ingredient labels because sometimes hidden nuts show up in unexpected places.
- These bars keep beautifully in the refrigerator for up to five days, so you can bake them the day before your event and spend your party time actually enjoying people instead of being stuck in the kitchen.
 Merken
 These bars have taught me that the most memorable desserts aren't always the most complicated, but the ones that arrive looking like a party and tasting like someone cared enough to get the details right. I hope they bring as much joy to your table as they've brought to mine.
Rezept FAQ
- → Wie entsteht der bunte Wirkeleffekt?
Der Effekt wird durch unterschiedliche Gel-Farbkleckse im cremigen Teig erzeugt, die mit einem Messer vorsichtig verblendet werden, um marmorierte Muster zu schaffen.
- → Kann ich andere Kekse für die Kruste verwenden?
Ja, statt Graham-Cracker können Vanillewaffeln oder Digestive-Kekse als Basis genommen werden, um der Kruste eine andere Note zu verleihen.
- → Wie lange sollten die Bars kühlen?
Nach dem Backen empfiehlt es sich, die Bars mindestens 4 Stunden oder idealerweise über Nacht zu kühlen, damit die Füllung fest wird.
- → Welche Lebensmittelfarben sind am besten geeignet?
Gelbasierte Farben eignen sich am besten, da sie intensiver sind und den Teig nicht zu flüssig machen, wodurch die Muster klarer bleiben.
- → Wie kann ich die Bars dekorativ verzieren?
Ein zarter Zuckerguss zusammen mit farbigem Streuzucker in Lila, Grün und Gold rundet das Erscheinungsbild ab und verstärkt den festlichen Charakter.
- → Sind diese Bars für Vegetarier geeignet?
Ja, sie enthalten keine Fleischprodukte und sind somit für eine vegetarische Ernährung geeignet.